三、VSCode for C/C++
Warning
本笔记基于 Windows,笔者已不再使用
3.1 软件、插件准备
| 软件 | 插件 |
|---|---|
| VsCode | C/C++ |
| Cmake | C++ Intellisense |
| MinGW | CMake |
| CMake Tools |
3.2 扫描工具包
Ctrl Shift PCMake: Configure左下方 扫描工具包 GCC 8.10:GCC 就是我们下载的 MinGW
3.3 前置知识:VSCode 替换变量含义
在编写任务配置时,拥有一组预定义的公共变量通常很有用。VS Code 支持在 tasks.json 文件的字符串内进行变量替换,并有以下预定义的变量。
| 变量 | 含义 |
|---|---|
| ${workspaceFolder} | 包含 tasks.json 文件的工作区文件夹的路径。 |
| ${workspaceRootFolderName} | 当前打开的文件夹的名字 |
| ${file} | 当前打开正在编辑的文件名,包括绝对路径,文件名,文件后缀名 |
| ${relativeFile} | 从当前打开的文件夹到当前打开的文件的路径。例如,当前打开的是 test 文件夹,当前的打开的是 test/first/second/main.c 那么此变量代表的是 first/second/main.c |
| ${fileBasename} | 当前打开的文件名+后缀名,不包括路径 |
| ${fileBasenameNoExtension} | 当前打开的文件的文件名,不包括路径和后缀名 |
| ${fileDirname} | 当前打开的文件所在的绝对路径,不包括文件名 |
| ${fileExtname} | 当前打开的文件的后缀名 |
| ${cwd} | 任务运行器启动时的当前工作目录 |
| ${lineNumber} | the current selected line number in the active file |
| ${env:Name} | You can also reference environment variables through ${env:Name} (for example, ${env:PATH}). Be sure to match the environment variable name's casing, for example ${env:Path} on Windows. |
3.4 g++编译调试文件
g++ 和 gcc
- g++:用于编译 c++源文件
- gcc:用于编译 c 源文件
3.4.1 g++编译单个文件
3.4.1.2 命令行模式
运行上述命令后,会生成myhell.exe的可执行文件,命令参数简介:
- g++:是
mingw64\bin中的g++.exe命令,用于编译 c++源文件 - -g:编译后的 exe 文件包含调试信息
- -o:为生成的 exe 文件取一个名字
如何使用该文件调试就不说了,我们直接进入 VSCode 模式!
3.4.1.2 VSCode 模式

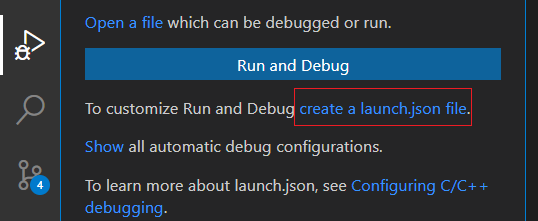
首先点击上图的create a launch.json file——>然后选择C++(GDB/LLDB)——>最后选择g++.exe -生成和调试活动文件

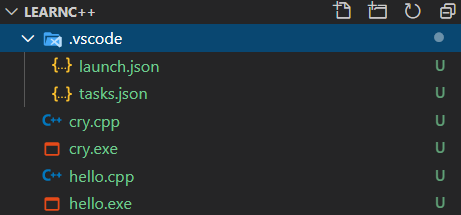
会自动生成.vscode,其中存在两个文件:
launch.json
{
  // Use IntelliSense to learn about possible attributes.
  // Hover to view descriptions of existing attributes.
  // For more information, visit: https://go.microsoft.com/fwlink/?linkid=830387
  "version": "0.2.0",
  "configurations": [
    {
      "name": "g++.exe - 生成和调试活动文件",
      "type": "cppdbg",
      "request": "launch",
      "program": "${fileDirname}\\${fileBasenameNoExtension}.exe",
      "args": [],
      "stopAtEntry": false,
      "cwd": "D:\\CodeIDE\\Environments\\C\\MinGW\\mingw64\\bin",
      "environment": [],
      "externalConsole": false,
      "MIMode": "gdb",
      "miDebuggerPath": "D:\\CodeIDE\\Environments\\C\\MinGW\\mingw64\\bin\\gdb.exe",
      "setupCommands": [
        {
          "description": "为 gdb 启用整齐打印",
          "text": "-enable-pretty-printing",
          "ignoreFailures": true
        }
      ],
      "preLaunchTask": "C/C++: g++.exe build active file"
    }
  ]
}
launch.json文件主要关注三个参数:
"program": "\${fileDirname}\\${fileBasenameNoExtension}.exe",这个参数是指定需要**调试的文件路径**,就是上图中的hello.exe和cry.exe"args": [],这个参数是 main 函数中的参数-
"preLaunchTask": "C/C++: g++.exe build active file",当调试一个文件前,会先执行对应preLaunchTask中的值的tasks.json文件中的label值的 task!参见下图的tasks.json文件,可以看到它:"label": "C/C++: g++.exe build active file",这个值与preLaunchTask相同! -
tasks.json
{
  "tasks": [
    {
      "type": "cppbuild",
      "label": "C/C++: g++.exe build active file",
      "command": "D:\\CodeIDE\\Environments\\C\\MinGW\\mingw64\\bin\\g++.exe",
      "args": [
        "-g",
        "${file}",
        "-o",
        "${fileDirname}\\${fileBasenameNoExtension}.exe"
      ],
      "options": {
        "cwd": "D:\\CodeIDE\\Environments\\C\\MinGW\\mingw64\\bin"
      },
      "problemMatcher": ["$gcc"],
      "group": {
        "kind": "build",
        "isDefault": true
      },
      "detail": "Task generated by Debugger."
    }
  ],
  "version": "2.0.0"
}
tasks.json主要关注三个参数:
"label": "C/C++: g++.exe build active file",同上"command": "D:\\CodeIDE\\Environments\\C\\MinGW\\mingw64\\bin\\g++.exe",运行 g++命令"args",其中的内容就是命令行模式的内容,-g 表示编译后包含调试信息,${file}是一个占位符,表示需要编译的源文件,-o 指定 exe 名字
如果我们把launch.json中的"preLaunchTask": "C/C++: g++.exe build active file"删除,那么在对生成 exe 文件 debug 时,永远 debug 的是曾经生成的 exe 文件,不论你怎么修改 c++源文件,都不会改变 exe 文件,因为你没有执行 g++命令(也就是tasks.json)来生成对应新源文件的可执行文件。
3.4.2 g++编译多个文件
一般来说,我们有一个 main 函数的 cpp 文件,还有一些方法的 cpp 文件和头文件,在 main 文件中调用了其他 cpp 文件中的方法,那么必须将这些文件打包编译,显然上述的方式是不行!
3.4.2.1 命令行模式
假设存在三个文件:
- hello.cpp
- add.cpp
- add.h
其中 hello.cpp 中有 main 函数,调用 add.cpp 方法,那么我们需要编译这两个文件:
.h 文件不需要在命令中出现,.cpp 文件之间使用空格隔开即可
3.4.2.2 VSCode 模式
Question
如何在 VSCode 中调试已经生成的 exe 文件?
我们已经知道launch.json用于调试文件,而调试文件之前会先调用tasks.json生成 exe 文件。
此时由于我们已经手动生成了 exe 文件,因此我们只需要对launch.json文件进行修改即可:
在命令行模式中我们已经生成了myhello.exe文件,我们对launch.json文件的 program 参数进行修改,改为我们想要调试的 exe 文件,也就是myhello.exe!
{
  "configurations": [
    {
      "program": "${workspaceFolder}\\myhello.exe"
      //"preLaunchTask": "C/C++: g++.exe build active file"
    }
  ]
}
这样子就可以运行了,不过有一个缺点,每次修改hello.cpp或者add.cpp文件中的某一个文件,都需要手动来 g++生成,于是我们修改tasks.json文件
我们已知tasks.json文件就是类似运行 g++命令用的,所以我们只需要在其中修改即可,比如我们修改:
此处就意味着运行:
然后在launch.json文件中启动preLaunchTask即可!
3.4.3 总结
tasks.json 就是运行编译命令,如 gcc 和 g++,生成可执行文件 exe!
launch.json 就是 debug 某个 exe 文件用的!
但是由于生成 exe 的源文件我们会随时修改,因此我们 debug 的 exe 文件必须是基于最新的源文件,也就是说,在执行 debug 之前,我们需要先运行 g++等编译命令生成最新版本的 exe 可执行文件!
3.5 Cmake 编译调试文件
https://cmake.org/cmake/help/v3.19/guide/tutorial/index.html
Cmake 类似于 g++命令,不过更加普遍化,可以在不同的平台运行。
此时我们的 tasks.json 文件中的 command 需要改成 Cmake 的命令!具体以后再说!