Blog = Github Page + Jekyll
Install Jekyll
Windows10 上安装 WSL2 Debian,安装 Jekyll:Jekyll Docs
# 依赖准备,注意一定要安装ruby-dev!
sudo apt install ruby ruby-dev rubygems nodejs
# 安装
sudo gem install jekyll
# 查看是否成功
jekyll --version
# 查看是否是最新版本
gem list jekyll
MacOS
# 依赖准备
brew install chruby ruby-install
ruby-install ruby
echo "source $(brew --prefix)/opt/chruby/share/chruby/chruby.sh" >> ~/.zshrc
echo "source $(brew --prefix)/opt/chruby/share/chruby/auto.sh" >> ~/.zshrc
echo "chruby ruby-3.1.2" >> ~/.zshrc # run 'chruby' to see actual version
# version should newer or 3.1.2
ruby -v
sudo gem install jekyll
Install and Run huxpro
huxpro 是 Jekyll 的一款主题,我们无需自己重新配置,直接拿现成的就行,这个主题非常棒:huxpro
# 安装bundler(一种包管理器)
gem install bundler
# Installed dependencies in the Gemfile
bundle install
# 可能需要这个依赖:sudo apt install zlib1g-dev
# 本地运行
bundle exec jekyll serve --trace
# 无法启动时安装该依赖
bundle add webrick
bundler:Ruby 开发的包管理,只需要一个 bundler install 命令,就可以下载 Gemfile 文件里的所有依赖,由于需要安装 Jekyll 的主题,主题用到了一些依赖需要用 bundler 安装!
启动后默认访问地址:http://127.0.0.1:4000/
huxpro config
_config.yml
你可以通用修改 _config.yml文件来轻松的开始搭建自己的博客:
Site、SNS、Build settings
# Site settings
url: "https://leqing.online/"

# SNS settings
github_username: happytsing # 你的github账号
twitter_username: leqing666 # 你的微博账号,底部链接会自动更新的。
---
# Build settings
paginate: 10 # 一页你准备放几篇文章
Jekyll 官方网站还有很多的参数可以调,比如设置文章的链接形式...网址:
Disqus settings
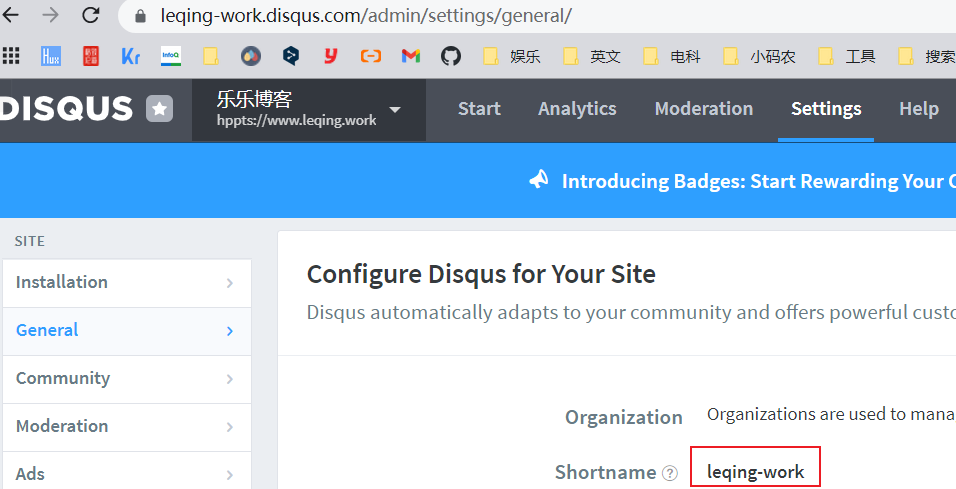
博客使用Disqus评论系统:
-
注册帐号
-
获取 Shortname:leqing-work

- 配置_config.yml
Analytics settings
网站分析,现在支持百度统计和 Google Analytics。需要去官方网站注册一下,然后将返回的 code 贴在下面:
# Baidu Analytics
ba_track_id: 0ef6a02a593e0bcddc16f48386c9d8a5

# Google Analytics
ga_track_id: "UA-49627206-1" # 你用Google账号去注册一个就会给你一个这样的id
ga_domain: leqing.online # 默认的是 auto, 这里我是自定义了的域名,你如果没有自己的域名,需要改成auto。
Friends
好友链接部分。这会在全部页面显示。
设置是在 _config.yml文件里面的Friends那块,自己加吧。
# Friends
friends:
  [
    { title: "Foo Blog", href: "http://foo.github.io/" },
    { title: "Bar Blog", href: "http://bar.github.io" },
  ]
Post Articles
要发表的文章一般以 markdown 的格式放在这里_posts/,你只要看看这篇模板里的文章你就立刻明白该如何设置。
文章最前面有如下的格式设定:
---
layout: post
title: "中国高等教育的系统性失败"
subtitle: "The Systematic Failure of Higher Education in China"
date: 2021-01-19 12:00:00
author: "HapppyTsing"
catalog: false
header-style: text
# header-img: "img/post-bg-2015.jpg"
tags:
  - Life
  - JAVA
---
在引入Rake工具之后,我们可以使用命令自动生成上面的文章模板:
rake 工具生成文件的逻辑在于 Rakefile:
# WlqFigureBed.github.io/Rakefile
post.puts "header-img: \"img/post-bg-2015.jpg\""
post.puts "header-style: text"
第一句语句生成的 markdown,在上传后会有图片:

第二句语句生成的 markdown,则不会:

Github Page
详情可以查看Github Page Docs。
Create Repository
Steps:
- 用于作为 Github Page 的仓库名字必须为:
username.github.io - 选择 Public 的仓库,创建成功后
git clone下项目! - 主页为根目录中名为 index.md 的文件,创建:
vim index.md,输入 hello world! git push,登录:hppts://username.github.io,已经可以看到网站
Two Question:
- 如何绑定自己的域名?
- 太丑,如何优化?:Jekyll
1.4.2 Bind Domain
记得完成:申请域名 -> 域名备案 -> 公安备案
教程详情参见:
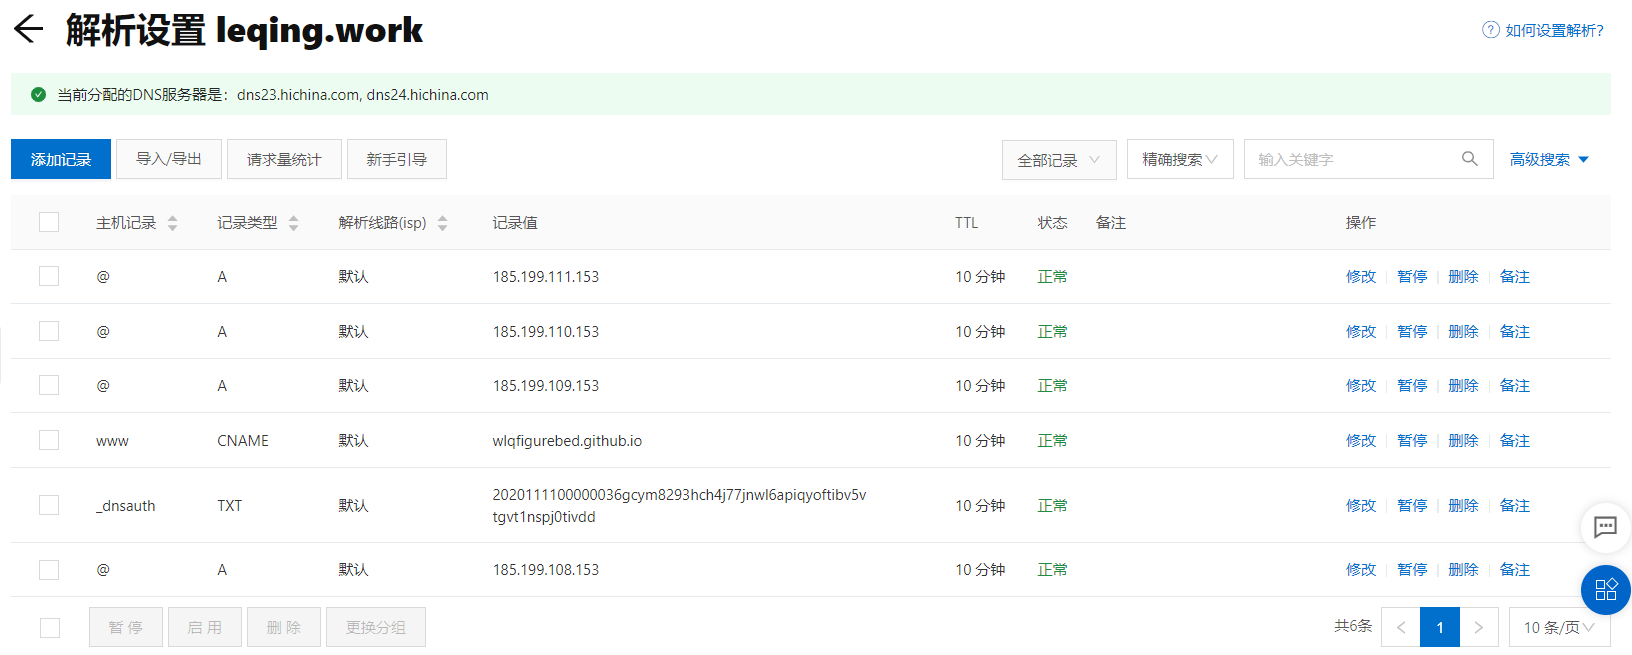
在阿里云 DNS设置 DNS 信息,如下:

在 WlqFigureBed.github.io/CNAME中输入如下内容:
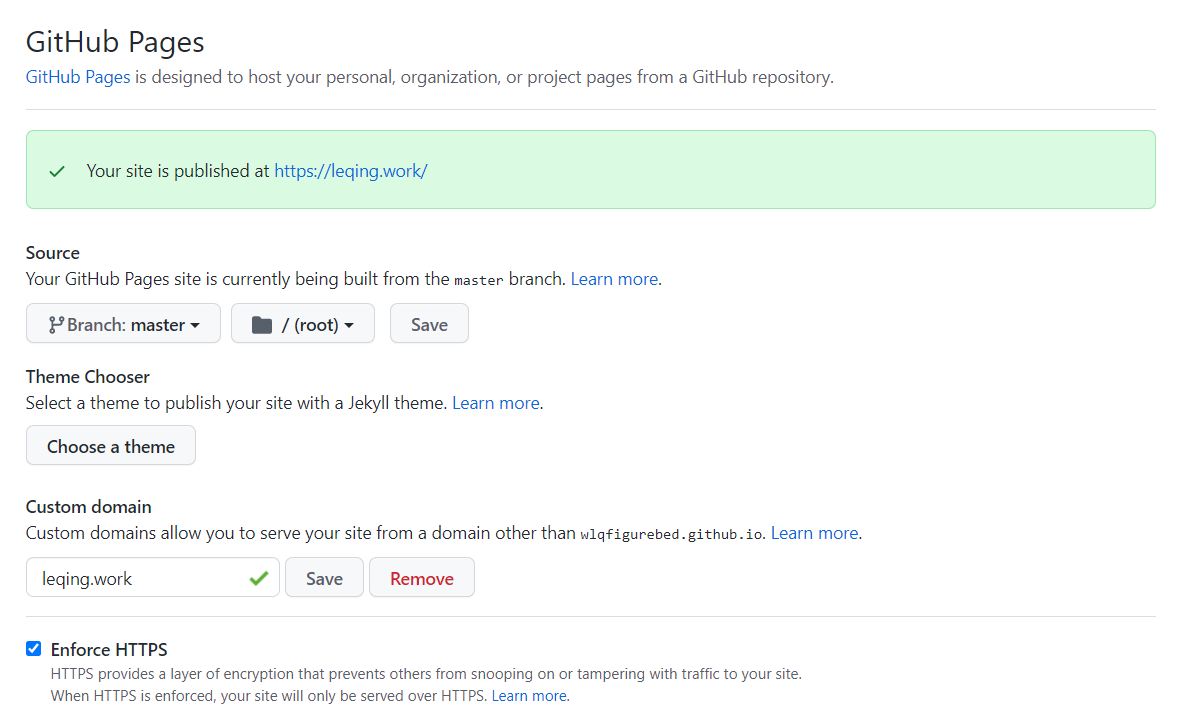
此后 Github Page 会自动识别,Github Page × Jekyll 这章的图中可以看到Custom domain会自动识别为leqing.online。
Note:change
- wlqfiguredbed.github.io -> happytsing.github.io
1.4.3 Github Page × Jekyll
将刚才的 Jekyll 主题的所有文件复制,粘贴到 Github Page 的仓库中即可!
配置_config.yml:
url: "https://leqing.online" # your host, for absolute URL
baseurl: "" # for example, '/blog' if your blog hosted on 'host/blog'
配置 Github Page:Settings -> Pages

Article Location
文章主要存储在三个地方:
- _posts
-
_includes/about
-
_includes/posts
_posts
存放真正发布的内容!
其中的文章开头有一些特殊设置,详见Post Articles
_includes/about
存放两个文件:
- en.md
- zh.md
是 about 页面的个人介绍信息
_includes/posts
存放一系列文件夹,其中每个文件夹下存放两个文件:
- en.md
- zh.md
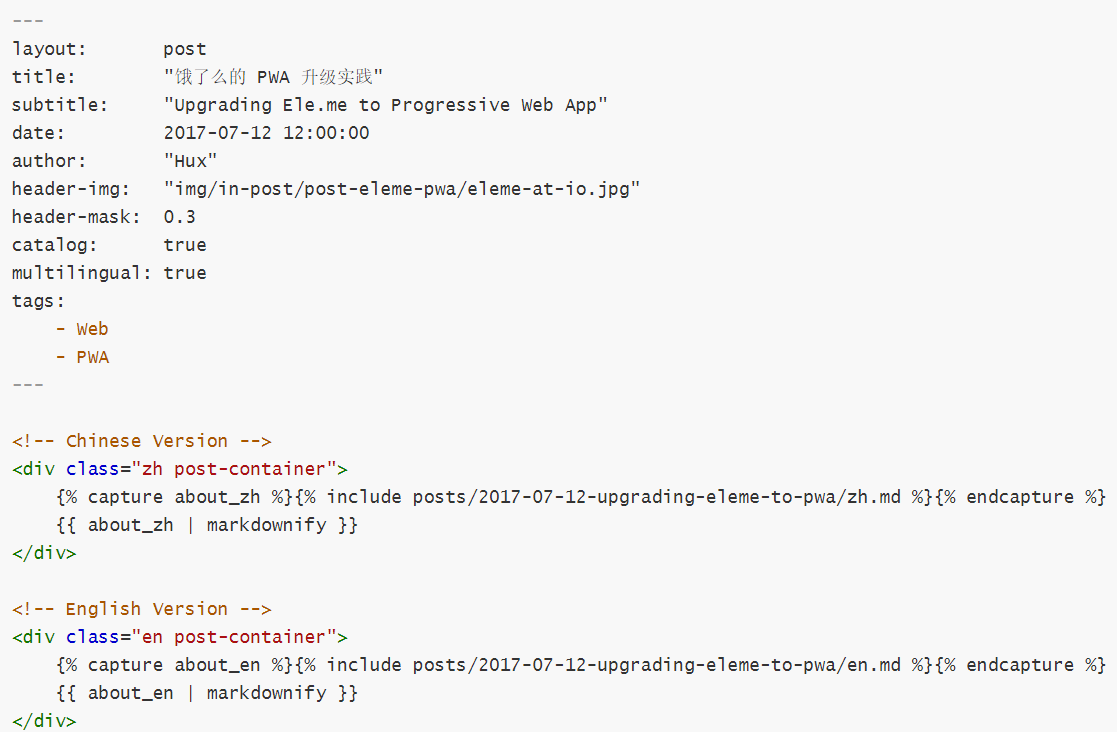
此时再查看_posts 文件夹下的文件,找到:2017-07-12-upgrading-eleme-to-pwa.md
其中的完整的文件内容查看:Available Both English And Chinese Versions。
Picture Location
img/archive-bg:archive.html
img/about-bg:about.html
img/404-bg:
- 404.html
- offline.html
img/home-bg:_config.yml
img/avatar:_config.yml
img/webicon:
-
_includes/head.html
-
_layouts 下的所有文件都有引用
/img/icon_wechat.png这个文件,但是只有其中的 default.html 没有将其注释掉!我将其改成了引用img/webicon/2.png,这个暂时不知道有什么用!
Available Both English And Chinese Versions
- xxx.github.io/_posts/2017-07-12-upgrading-eleme-to-pwa.md

- xxx.github.io/_includes/posts/2017-07-12-upgrading-eleme-to-pwa

注意:en.md 和 zh.md 两个都是单纯的 markdown 文件,且不需要:
诸如以上的内容是不需要的!直接输入内容即可!
- Final Effects
